Wednesday, August 25, 2010

Paint Sample Wall Hanging

One of my (many) house projects is to decorate our guest room. This may sound somewhat simple, but I have a slight complication. You see, the guest that's here most often is Mr. 31's 10 year old brother, but the room also has to be suitable for grown ups. So, I've decided to decorate the room in shades of blue, using metal washers as accents. That way, it can look polished enough for adults, but in a fun, funky way suitable for a 10 year old Star Wars fan.

One of the first projects was a wall hanging. Inspired by the Iron Crafters challenge from Fireflies and Jellybeans, I decided to make it out of paint samples and washers.

I started by gathering paint samples in the shades I wanted: Ink Drop, Blue Corn Chips, Lazy Day, City Gray, and White (in Kilz brand).

Then I purchased 1 inch wide washers, navy blue satin ribbon, and fishing line.

I started the process by punching circles out of the paint samples using a 1 inch punch. I got 4 circles out of each sample. Then I punched 2 holes in each circle using a safety pin, unless the circles were going to be on the top or bottom line, in which case it got 3 holes.


Next I laid out the pattern I wanted (the hanging measures roughly 24 inches by 18 inches).


I then strung the top and bottom lines of the design using the fishing line and secured the line using hot glue.

I assembled the rest of the hanging upside down. I found out it much easier to assemble that way so I could glue without having to flip each piece over.


Once all the paint sample circles and washers were strung together (and my back was sufficiently sore from bending over it!), I decided to glue some smaller circles from the paint samples onto some of the circles to make it a little more interesting. Then I strung the navy ribbon through the 4 washers on the top line. The hanging will hang from those ribbons when I actually hang it.


I'm happy with the results. It's fun and different, and will add a nice touch to the guest room. Also nice: the cost. The total was roughly $8.00, though that's the total cost with the fishing line and ribbon, both of which I have lots left over.

I'll be linking with Fireflies and Jellybeans' Iron Crafters contest and also the usual suspects on my link party page.

Tuesday, August 24, 2010

A to Z Bread Variation 1

So, I was cruising the Tasty Kitchen the other day, when I stumbled across a recipe called A to Z bread. It's a basic quick bread recipe that you can then add 2 cups of whatever to (there's a nice suggestion list with the original recipe).

On Sunday, I was faced with 3 bananas that were not going to make it to Monday. Rather than overdose on potassium by eating them all, I decided to make the A to Z bread with bananas being the base of my 2 cups of whatever. And, what's so great about this recipe is, I didn't have 2 cups of bananas, so I just dumped in some applesauce to make up the difference. No trip to the store! Which made Mr. 31 happy.

This recipe is so good, I will be making it again. So, for now, we will call this version A to Z bread Variation 1. The only change I made from the original recipe was that I took away some cinnamon and added nutmeg (gotta have nutmeg!) and I halved the amount of nuts (only because that's all I had in the house, not making a stance or anything).

A to Z Bread Variation 1
Adapted from Tasty Kitchen


3 cups flour
1 tsp. salt
1 tsp. baking soda
½ tsp. baking powder
2 tsp. cinnamon
1 tsp. nutmeg
3 whole eggs
1 cup oil (I used canola)
1 ¾ cup sugar
3 tsp. vanilla
½ cup pecans
1 ½ cups mashed banana
½ cup applesauce

Heat oven to 325.

Sift dry ingredients and set aside.

Beat eggs in a large bowl. Add sugar and oil; cream well.

Add bananas, applesauce, and vanilla and mix well. Add nuts.

I poured half of the batter into a well greased loaf pan and the other half into 4 well greased mini loaf pans.

Bake the mini loafs for 35 minutes and the larger loaf for 50 minutes.

Please check out my links page for all the great parties I'll be linking to!

Wednesday, August 18, 2010

Decorating a Filing Cabinet

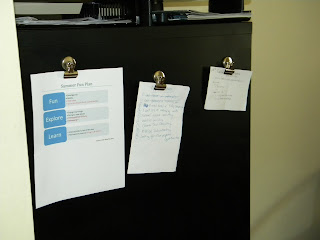
A while back, I mentioned that we moved my husband's office downstairs. It has been working out great (he's even keeping it clean! Miracles do happen!). But there a few things that have been bugging me.

One is the side of the filing cabinet, which is in full view from the living and dining rooms. Here's what it has looked like:

Functional, but oh so unattractive.

I had some picture frames in the attic which I wasn't using that I thought would go great with the filing cabinet. And I'd be much happier looking at pictures than business notes. But how to hang them on the filing cabinet?

Then I came across some thick red ribbon at Walmart clearanced at $1.00 a spool. Perfect! I purchased some magnet clips from Staples to hang the ribbons from. What with adding ribbon, I figured I'd "man" the arrangement up a little bit with the metal clips. It is a guy's office, after all.

So, I sat down the photo frames and the ribbon and my hot glue gun and went to town. The result was this:


It was okay, but a tid bit boring. So I went to work again with some green ribbon I already had from decorating the living and dining rooms and ended up with this:


Much better! And much more pleasing to me than looking at random bits of paper.

I have had to promise to make Mr. 31 some kind of bulletin board, but one that can be posted in a more inconspicuous spot. Win-win!

Please check my link party page for the parties I'll be joining!

Tuesday, August 17, 2010

Is it Soup Time Yet?

Okay, I know it's still August, and it's hot and humid but....I miss soup. I love soup. So warm and comforting. So many different varieties.

In honor of my love of soup and the fact that soup season can't come soon enough, I thought I'd share a slow cooker soup that even my husband (who refuses to consider soup a main course) loved. I also love that the longer cook time means that it can cook while I'm at work plus a little bit afterwards so I don't have to worry about dealing with it first thing when I get home.

Brown Jug Soup
Adapted from Fix-It and Forget-It Cookbook: 700 Great Slow Cooker Recipes (Fix-It and Forget-It Series)


1 (10 1/2 oz.) can chicken broth
4 chicken bouillon cubes
1 qt. water
2 cups diced onions
4 cups diced potatoes
2 cups diced carrots
1 (10 oz.) package frozen whole kernel corn
1 (10 oz.) package frozen green beans
2 (10 3/4 oz.) cans cream of chicken soup
1/2 lb. Velveeta cheese, cubed

1. Combine all ingredients except cheese in 4-5 qt. slow cooker.

2. Cover. Cook on Low 10-12 hours or until vegetables are tender.

3. Just before serving, add cheese. Stir until cheese is melted.

Please check out my Link Page to see all the wonderful blogs I'll be linking with.

Wednesday, August 11, 2010

Bathroom Makeover

This week I am getting ready to hold a yard sale. I adore the feeling of getting rid of stuff you don't want or need!

But that also means I haven't worked on much around the house except sorting through our belongings. So, I decided to do another blast from the past.

This time I'm going to highlight a bathroom we did in the same flat that we did the fireplace redo in. The fireplace I showed you is from the second floor. This bathroom is on the first.

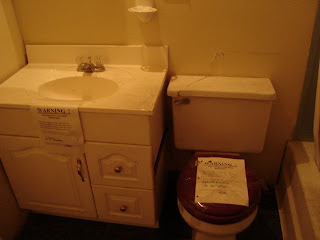
Here are some before pictures of the bathroom. And, yes, we did know what it looked like when we bought it.


This just makes you want to jump right in and take a bath, doesn't it? It just screams clean and refreshing.
J'adore the burgundy toilet seat and the random missing piece off of the side of the vanity. How do you even take that piece out??

It's always convenient to have your mirror six feet above the sink.


And this window placed in the middle of that lovely blue surround makes the local Peeping Tom's job so much easier! Because, bear in mind, this bathroom window that goes to waist level is literally less than 15 feet away from the next door neighbor's window. So convenient!

But, ladies and gentleman, I saved the best for last. This was the ceiling...if it still qualifies as that:


Why, yes, that would be a gaping hole going up to the second floor bathroom that is surrounded by mold.

Mr. 31 and I gutted everything except the tub and started from scratch. We felt it would be best.

Now, keep in mind we renovated this house to be used as a rental, so it's not heavily decorated and stuff was put in to stand up to the wear and tear of tenants. But I think it still makes for a pretty good after.


Goodbye creepy stalker window!! Hello shiny new white tub surround!!

Also, hello to a new mirror, lighting, ceramic tile floor, toilet, and pedestal sink!

You'll also notice a drop ceiling. I wouldn't have done that if it was my home, but I'm glad we did it in the rental unit. Tenants that have lived on the second floor haven't always paid attention when they're filling the tub. Much easier to replace individual ceiling tiles than a drywall ceiling...multiple times....

Mr. 31 and I ended up moving into this very apartment when we got married (we bought the house before we got married while we were still living with our respective parents. When we got married it made sense to move into the flat for awhile). The toughest part of moving in for both of us: taking that first shower in that bathroom. It didn't matter that it had been gutted and scrubbed to within an inch of its life - all we could think of was the "before." But we got over it. Not taking a shower for a year and a half would have been bad.

Check out my link page for all the wonderful blog partays I'll be linking up with.

Monday, August 9, 2010

Bruschetta Bread

One day last week, I was faced with the following conundrum: what could I fix that would use up the last 1/3 of a loaf of Italian bread, a handful of grape tomatoes that were on the verge of becoming wrinkly, and a basil plant that is threatening to take over our back yard?

Bruschetta! Or my version of it anyway! What's great about it (and also makes it hard to write down) is that these measurements don't have to be exact - just use what you have on hand.

Bruschetta Bread

Pesto:

4 cups fresh basil, loosely packed

1/2 cup parmesan cheese

5-6 cloves garlic

3/4 cup olive oil

salt and pepper to taste


Italian bread or something equivalent

2 cups diced tomatoes (I used a combination of the grape tomatoes plus a couple of Better Boys from our garden)

1 cup or so of mozzarella, depending on how cheesy you want it

3 tbs. butter, melted

Put the ingredients for the pesto, except parmesan cheese, into a food processor. Blend well, but the goal is not to liquify it. Put into bowl and stir in parmesan cheese. Set aside (I actually like to set this aside for 1/2 hour or so to allow flavors to blend, but that is not necessary)

Brush the slices of Italian bread with the butter. Then spread pesto on each slice (the amount depends on personal preference). Top with diced tomatoes and then mozzarella.

Place on baking sheet. Bake at 350 for 10 minutes or until cheese is melted (sometimes I put in the broiler to speed things up).

Please check out my link party page to see the wonderful blogs I'll be linking up with.

Green Tomatoes "Recipe"

After my post last week on my love of green tomatoes, a few of you asked for my recipe. Well, I don't have a recipe per se, but I do have a method, so I'll share that now.

First, I cut up some lovely green tomatoes into slices about 1/4 inch or so thick (I'm not big on or talented at exact cutting). Then I lay them all out and sprinkle them with either seasoning salt or Creole seasoning to taste. I flip them over and sprinkle the other side.

Then I put some flour on a plate (how much flour depends on how many tomatoes you're doing). I dredge each slice in flour and set them aside.

Then, I heat up about 1/4 inch of olive oil in a skillet over medium high heat.

After the oil is hot, I dredge each tomato slice in the flour AGAIN right before I put it in the oil (sometimes I sprinkle some of whatever seasoning I'm using into the flour for this second dredging...sometimes I don't. Whatever floats your boat). Then I lay the tomatoes in a single layer in the oil and flip them once the first side gets a nice brown crust on it. Take the tomatoes out of the oil when both sides are nicely browned and put on a paper towel lined plate. Depending on how many tomatoes you're doing and the size of your skillet, you may have to do several batches.

Then, because you're impatient like me, eat your first fried green tomato when it's waaaaay too hot and chew it with your mouth open to get some cool air in there because you couldn't possibly swallow something that hot.

And that's my method. I'm sure someone else has a better one, but this works for me!

Friday, August 6, 2010

Craigslist Made Me Happy

I have long heard mythical stories about fabulous Craigslist finds. You know the kind: "I found an antique ebony dresser and matching vanity for $3.00! Woohoo!" Now, I totally believe people when they tell me these stories. But, during my Craigslist searches I was seeing items that were more like "you can have my 1980s era, gigantic, laminate entertainment center for $125.00!" Until Monday, that is, my friends.

I was just glancing through the latest listings when I saw one that said "free pianos". I've been wanting to get a piano for Mr. 31 for ages; he loves to play but doesn't have much opportunity to do so. So, I opened the listing, thinking it was going to be (a) a scam, or (b) a serial killer trying to lure me to his house, or (c) a piano missing all the strings and hammers or something.

But it was for real! A local church was giving away old pianos they no longer used. So I told Mr. 31 to call the church first thing Tuesday morning. He did one better: he went to the church first thing Tuesday, and it's a good thing he did. The church's phone was ringing off the hooks with people interested in the pianos, but Mr. 31 was the first person to physically show up to look at the pianos, so he got first dibs!

So, long story short (too late!), we are now the proud owners of an upright grand piano that we know was built by a company that was located in our hometown and it was built somewhere between 1900 and 1920. And it's really pretty (oh yeah, it sounds good too!)!

Below are some pictures, including some closeups of the decorative accents. Also, I love how the center panel tilts out to hold music!


Thank you Craigslist!!

Thursday, August 5, 2010

Anniversary Top Ten List

Today is Mr. 31's and my 4th anniversary. Yay! So, in honor of that, here are the top 10 reasons I love my husband:

10. He indulges me by pulling into Dairy Queen when I've had a bad day....or a good day.

9. He cares enough and is honest enough to stop buying me Dairy Queen for my own good.

8. He has great taste in women. He married me, didn't he?

7. He thinks outside the box. Which means I'm never bored.

6. He's got a good sense of humor, which helps when you live with ME :)

5. He's funny. Like REALLY, genuinely funny...which a lot of people don't know because he's fairly reserved in public.

4. He is beyond patient and compassionate to everyone around him.

3. He always aims to be a godly husband and always has my best interests at heart...though sometimes I act like I don't know that when he makes some decisions...like when he says we can't go to Dairy Queen.

2. He loves me.

1. He loves the Lord.

Happy anniversary Mr. 31!

Wednesday, August 4, 2010

Recipe Flip-Stand

Recipe printouts have been a long standing problem in my house. I find recipes I want to try, so I print them out and add them to my recipe folder. Then I find some favorites and they slowly disintegrate into a food stained, folded edged, hard to read piece of paper. Another big problem: when Mr. 31 goes to get one of his tried and true recipes, it is lost in the stack of my new recipe finds. And, believe me, I hear about it: "Why is this recipe you've never made on the top of the stack, and my waffle recipe is in the middle? You aren't even going to make that recipe right now - we don't have any pumpkin (or heavy cream or pudding mix or some other ingredient we don't normally stock in the house)."

Then I saw the fabulousness that is the cookbook stand at Finding My Aloha. And I knew it was the answer to my prayers - or Mr. 31's prayers, whatever.

I had the perfect frame on hand already. I had gotten it during the summer between high school and college, and it was still full of homecoming and prom pictures from senior year.


Here it is with Sammy, who shouldn't be on that table. Photographic evidence of misbehavior! Yeah, like that'll keep him off of it.

So, I emptied the pictures from the flip frame and added them to my stack to be added to a photo album/scrapbook at some point. You know, when I have spare time to make a scrapbook.

My frame is two sided, as evidenced below:


So, I made one side Mr's 31's favorite recipes and the other side my favorite recipes. I retyped our favorite recipes onto 4x6 pieces of paper and slipped them into the photo sheets.


I love this solution! It keeps our favorite recipes close at hand and in protective sheets. Perfection!

Check out my link party page for all the blog parties I'll be joining!

Tuesday, August 3, 2010

Spaghetti and Meatballs

I adapted this recipe from the FABULOUS Pioneer Woman. I do not make my own sauce, though. Not that brave yet and, honestly, sometimes that extra time makes a big difference between eating at a decent hour and falling asleep in my plate. I doctor up jarred or *gasp* canned spaghetti sauce with extra seasonings or our own crushed tomatoes we canned last year.

Spaghetti and Meatballs
Adapted from The Pioneer Woman


1 ½ lbs. ground beef
5 cloves garlic, minced (separated)
¾ cup seasoned bread crumbs
2 eggs
½ cup shredded mozzarella, chopped into smaller pieces
¼ cup fresh parsley or basil, minced
¼ tsp. salt
Freshly ground pepper, to taste
splash of milk
½ cup olive oil
½ large onion, diced
1 16 oz. package spaghetti or favorite pasta
1 jar/can of spaghetti sauce
1 can diced or crushed tomatoes

Combine meat, 3 cloves of garlic, breadcrumbs, mozzarella, Parmesan, eggs, salt, pepper, parsley or basil, and splash of milk in a bowl. Mix together well with hands. Roll into 1 1/2 inch balls and place on a cookie sheet or plate. Place meatballs in freezer for 10 minutes to firm up.

Heat olive oil in a large skillet over medium-high heat. Add meatballs 8-10 at a time, turning until browned on each side. Remove to a paper-towel lined plate.

In the same pot, add onions and remaining garlic and cook for a few minutes, until translucent. Add spaghetti sauce and tomatoes. Add meatballs and stir in gently. Reduce heat to a simmer and cook for 30 minutes, stirring gently every so often.

Serve over cooked spaghetti. Sprinkle with extra Parmesan.

Check out my link party page for all the wonderful blogs I'll be linking up with.

Monday, August 2, 2010

I Love Fried Green Tomatoes


All I want to say today is that I love fried green tomatoes. They make me happy.

I also want to say thank you to Mr. 31's little brother for knocking down a bunch of green tomatoes with a basketball. Mr. 31 is more into letting the tomatoes go red than eating them green.